This is an article that I submitted for the Nov./Dec. , 2016 issue of Lawn & Garden Tractor Magazine. As I’ve mentioned previously, it’s a great magazine and I highly recommend it.
I will always have fond memories of my Dad on his 8N Ford. Dad was an IH guy with the exception of his 8N. It was his four wheeler before there were four wheelers. Besides using it to rake hay and run the hay elevator, he used it to check his cows during calving season and check his crops. Whenever he wanted to hunt squirrels or mushrooms, the 8N was used to get to the woods. When the grandkids wanted to go for a ride on a tractor, he got out the 8N.
After seeing the N series fiberglass kit offered by www.awesomehenry.com, I always considered building a Mini 8N. My wife was aware of the sentimental attachment and purchased the kit for my 72nd birthday. (I think she also had an ulterior motive. Since I had a scheduled hip surgery she knew it would “motivate my recovery”.) She was right. As soon as I was able I was back in the shop working on the Mini 8N.
Don Knasel and his son have been offering the kits for a long time. Unfortunately Don recently passed but his son, Dave, continues to offer the kits for sale. It all began when they were looking for a Funk Conversion (no relation to me) that replaces the 4 cylinder flathead for an 8N Ford with a V8. Since those conversions are rare, they eventually decided to manufacture and sell their own version. From there they decided to manufacture a Mini kit as well.
The kit comes with a hood, fenders, front bumper, radiator cap, decals and lights. The kit can also be purchased with a dash panel and wheel inserts that mimic the original, rear Ford wheels. My wife purchased the dash panel but not the wheel inserts.

Since I’m a Cub Cadet guy, I used a Cub Cadet frame for the Mini 8N. I also decided to use a 7 hp Kohler engine to keep with the “smaller” tractor theme. After assembling the frame, wheels and engine and a little thought, I decided the first step was to mount the hood. The dash panel represented more of a challenge than I was willing to undertake after my surgery. The dash panel for an 8N has the steering wheel centered in the dash. For a Cub Cadet, the steering wheel is not centered but offset to the left. That will require a couple U-joints and some added support for the steering. Looks like that will be a future modification.
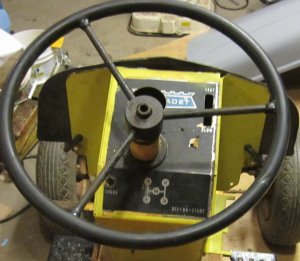
To make a support for the rear of the hood, I stood the 8N hood on its’ end on top of a piece of 16 gage sheet metal. After tracing around the hood, it was just a matter of cutting out a section that matched the hood profile. When I C-clamped the profile section to the Cub Cadet dash and test fitted the hood, it became obvious that I wanted the section mounted as low as possible. I had to trim the outer edges of the Cub Cadet pedestal to get the lowest possible profile.
With the rear support in position it was just a matter of setting the hood on the tractor and deciding how to support the front of the hood. (Unfortunately my camera quit working at this point, and I wasn’t aware that the pictures I was taking weren’t any good. You’ll notice the rest of the pictures were taken after I had painted the tractor red.) The front hood support had to be extended out a small distance from the front of the Cub Cadet to get the correct look. It required attaching a short section of 2 X 2 inch square tubing as a spacer on top of the frame to get the correct height for the mounting. The mounting just consisted of a section of 1 X 1 angle with a ¾ inch round welded to each end with a 5/16 inch hole in each round to bolt on the hood.


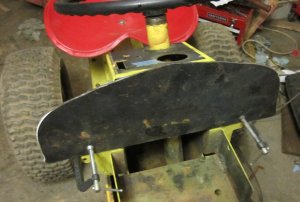
To mount the fenders, I cut off a section of 2 X 2 inch angle and bolted it to the rear axle tube. Since the axle tube on a Cub Cadet is tapered, I had to add a small, thin section of flat so the mounted fender would be vertical. You can see that spacer sticking out the side of the 2 X 2 angle in the pictures.


With the fenders bolted in place, the only remaining item was the front grill.
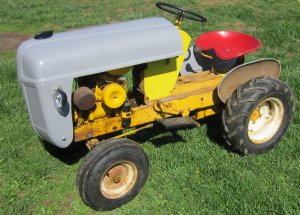
The front grill had to have supports that either came out around the hood or extended from the tractor frame under the hood. I felt positioning the supports under the hood would look better and provide better support. That involved two requirements. First, the hood had to have enough clearance that it could be raised to service the engine. Secondly, since I wanted the option of either driving or backing the 8N onto my trailer for transport, the grill and support also had to be high enough to clear the sides of my trailer. Once the decision was made, it was just a matter of doing it while keeping in mind the two requirements. It required a quarter inch thick spacer on each side between the bottom of the tractor frame and grill support to allow for enough room to raise the hood for servicing.

We wanted to display the tractor at a local July show, but the weather wasn’t cooperating. I did manage to get one coat of paint on the tractor before the show, but it would require waiting for a second coat before we could add the decals.


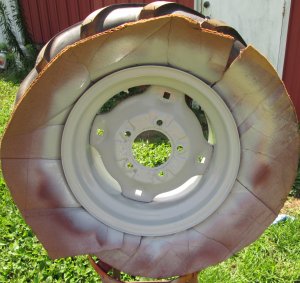
With the July show over and better weather, I managed to apply the second coat of paint. Tires are a lot easier to paint when they have tubes.
With the paint dry, my wife helped install the decals. Decals are a lot easier to apply on a kitchen table in air conditioning!!

The decal for the fender is much easier to apply when the fender is laying flat on a table.

Now it was just a matter of installing everything back on the tractor and taking the final pictures.


And that’s it!! An interesting change for committed Cub Cadet guy. Oh, wait, there’s that Mini fiberglass dash that my wife purchased with the kit. Looks like she’ll have another unfinished project to remind me about…….
As always, if you have any comments or questions, you can contact me through this website.
