If you’re like me, when you figure out how to do something, you just do it and move on to the next job. That’s the way I generally am when I figure out how to get a nut in a hard to reach place. I was trying to get a nut started on a bolt in a very long, narrow space when a friend stopped by and commented on how I was doing it. His comment lead to my documenting what I did for my web page.
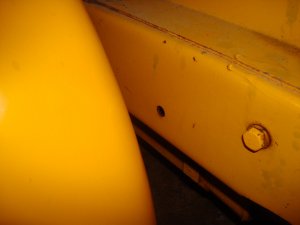
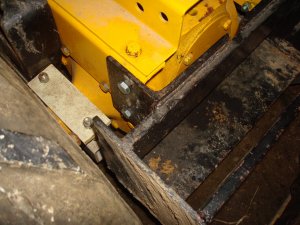
There’s a bolt hole on each side of several of my narrow frame Cub Cadets just in front of the seat that I assume Cub Cadet used in the manufacturing process. Because of the proximity to the transmission, it’s virtually impossible to get a nut started on a bolt placed in either of these holes by ordinary means.

On my Model 73 with a front end loader, I’ve attached an extra weight to each side using a bolt that extends through the frame to hold them in position. The bolt goes through the hole discussed and pictured above.
Since I couldn’t reach along side the transmission to hold a nut in position, I “engineered” a longer wrench.
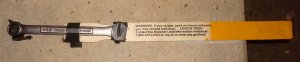
Notice that it’s just an open/box end wrench taped to a paint stick using electrician’s tape. (You might notice the color on the paint stick is Cub Cadet yellow!!) There’s also a piece of tape across the back of the end of the box end wrench. This piece of tape holds the nut inside the wrench until it’s started on the bolt.
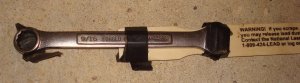
The wrench shown in the picture has already been used to place two nuts. The tape that holds the nut in position in the wrench was in better shape when I started.
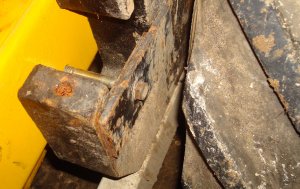
Sometimes you can reach the position where you want to place a nut, but you just don’t have the necessary room to securely hold the nut to get it started. You can hold the nut between your two fingers, but you can’t quite get it turned at the right angle to start!!! That happened when I tryed to start the nuts on the bolts that hold the rear weight bracket in place on my Model 73 with the loader.

In these cases I’ve found you can often use a piece of tape wrapped around your finger to hold the nut.

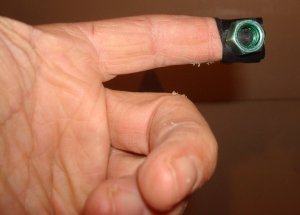
I’ve usually been lucky enough to just wrap the tape around my finger tight enough with the “sticky” side out to get it to hold tight enough that it won’t slide off the end of my finger. In a few cases I’ve had to use an additional piece of tape to tape the sticky side out piece on my finger. I’ve also found it’s generally easier to press the nut against a side and slide it into position over the hole before inserting the bolt. Sometimes, with a little luck, you can position the nut on the bolt with the bolt already in place, but I’ve generally found it works better to position the nut first.
I hope you find these techniques useful. As always, feel free to contact us with any additional questions or suggestions.
