I am not a Wheel Horse collector and know very little about them. So this section just contains the information that I’ve managed to collect while finding information on rebuilding Cub Cadet pumps. The two pumps are built so similarly that I would recommend reading the Cub Cadet section for anyone that’s interested in rebuilding a Wheel Horse pump.
Externally, the Wheel Horse pumps appear identical to the Cub Cadet pump.

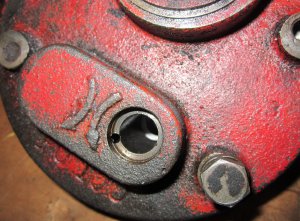
The major differences that I see are: The WH pump (red pump in above picture) obviously has different fittings for the hydraulic connections. The control handle for the WH pump screws into the top of the control instead of the side. The Cub Cadet pump has a fill plug in the reservoir while the WH pump as a fill plug in the “head” of the pump.
Apparently, internally, there were two different versions of the WH pumps. One,

was identical to the Cub Cadet pump shown above.
Take special note of the return spring.
The other type pump,

had major internal differences. Take special note of the valve return spring and the configuration of the valve itself. Also, it’s not obvious in the picture, but the right-hand stub shaft that holds the driven gear, is 1/2″ diameter. In a Cub Cadet pump, that stub shaft is 3/8″ and the driven gear has a 1/2″ O.D. by 3/8″ I.D. bearing in the gear to fit the smaller shaft. The Wheel Horse pump contains no bearing.
I found a schematic of a Toro HY-2 pump that appears to be the same as the WH pump.

(Click on the image for a larger view.)
Notice that the pump appears very similar to the Cub Cadet pump except for the mounting of the spring on the valve and the shape of the spring.
I obtained a WH pump that had a busted internal spring.

I had planned to use the pump for parts, but managed to find a new spring that can be ordered from JC’s Farm &Garden Supply. It is part number 4837 and their phone number is (219) 299 4708. They also carry replacement gears. They have the replacement spring for the pump like the one used on a Cub Cadet as well, Part No. 5281, If you want to order parts from them, just call the number above and leave a message. John will call you back. Do Not use the JC’s Supply website. It belongs to a previous owner and has no connection to the present owner. )
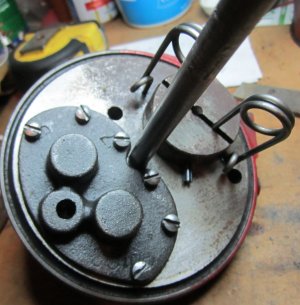
When I received the replacement spring and installed it in my pump, it was too long.

In the picture, the “legs” of the spring are bottomed in the holes they are inserted in and the center of the spring just reaches the top of the valve body. That meant the legs had to be shortened the depth of the slot in the valve body. I used a depth gage to determine that depth and cut off the appropriate length. (Notice the top roll pin extending out of the bottom of the valve body in the picture above. After the center of the spring is “bottomed out” in the slot, that roll pin is driven back in and holds the spring in position.)

Notice the small pieced still connected to the upper leg in the picture above. I left it that way to illustrate how much the leg had to be shortened. With the legs shortened I inserted the spring in the valve body.
The shortened spring is inserted in the valve body in the above picture. Notice the roll pin has also been driven in to hold the spring in position.
I should also mention that the spring I received from JC’s Farm Supply was also made of just a little larger wire diameter. It wasn’t really a problem, but everything did fit snugly.
The other thing that I did was to drill and tap a new hole for mounting a handle since, as mentioned previously, the handle for the WH is located at a different orientation than a Cub Cadet.
Since the valve is made of cast, it was easy to drill and tap. As you can see in the pictures below, I drilled and tapped the hole before installing the spring. (It’s a 3/8-16 thread.)


With the new spring installed and a new hole tapped, it was time to install the bearing seals. (The seal part numbers are listed in the Cub Cadet article.) There’s an oil return hole that I didn’t want to completely cover.
I found that a 7/16″ socket worked well for driving the seals into place. As with the Cub Cadet pump, I used two seals.

It’s a little difficult to see, the there still a little of the oil return hole showing. After inserting the shaft, I replaced the cap. There’s no seal. It’s only necessary to tighten the screws to hole the cap in place.
Replacing the oil reservoir completed the assembly.

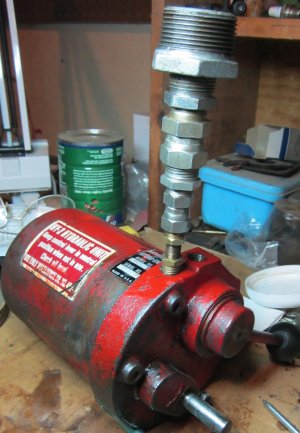
Now the only problem was getting hydraulic fluid into the reservoir. (I always use Hy-Tran hydraulic fluid in these pumps.) The WH manual shows using their brand of hydraulic oil in a smaller squeeze can. I tried using a plastic bottle that I had, but only succeeded in making a mess. I ended up using a system I use to fill the creeper on a Cub Cadet. I’m sure if I worked at it, I could come up with a simpler pipe system, but these are the parts I originally had and continue to use. I only had to add the bottom fitting to get it to match up to the WH fill hole.
And that’s it. As always, if you have any questions or comments, you can contact me through this website.
